LAB 1 : LABORATORY SAFETY & LAB 2: INSTRUMENTATION
LAB 1 : LABORATORY SAFETY
INTRODUCTION :
Laboratory safety is of paramount importance. That’s exactly
why this safety resource has been created, to encourage and promote safe and
efficient working practices in any lab. Many laboratory guidelines are written based on experience notably when things have gone badly wrong.Remember, you could be dealing with
extremely dangerous and hazardous chemicals, so caution is required at all
times.Whilst many laboratories are governed by their own rules and
regulations, much of the safety precautions come down to each individual
student. Staff can’t be available at all times for supervision and for this
reason; responsibility ultimately falls to the individual. Many laboratory accidents and problems are accountable to
haste. In the lab however, it’s important to take your time - not only for
safety reasons, but also to avoid wasting samples, money and time.
METHODS:
LABORATORY SAFETY PROCEDURES:
- We should reporting all spills and broken glassware to the instructor and receiving instructions for clean
- Always washing hand prior to and following laboratories and anytime contamination is suspected.
- Disinfecting lab benches and equipment prior to and at the conclusion of each lab session, using an appropriate disinfectant, and allowing a suitable contact time.
- You should identification and proper disposal of different types of waste
- Reading and signing a laboratory safety arrangement indicating that the student has read and understands the safety rules of the laboratory.
- Having a good lab practice, including returning materials to proper locations, proper care and handling of equipment, and keeping the bench top clear of extraneous materials.
PROTECTIVE PROCEDURES
- Must wearing long pants or dresses ( NO shorts, NO sandals ).
- Tying long hair back, wearing personal protective equipment ( eye protection, coats, gloves, glasses may be preferred to contact lenses), and using such equipment in appropriate situations.
- Always using appropriate pipetting devices and understanding that mouth pipetting is forbidden.
- Never eating or drinking in the laboratory.
EMERGENCY PROCEDURES
- location and properly using emergency equipment ( eye wash stations, first aid kits, fire extinguishers, chemical safety showers, telephones, and emergency numbers).
- you should reporting all injuries immediately to the instructor.
- following proper steps in the event of an emergency
CHEMICAL SAFETY
- Treat every chemical as if it were hazardous
- Never " smell " a solvent!! Read the label on the solvent bottle to identify its contents
- Make sure all chemicals are clearly and currently labeled with the substance name, concentration, date, and name of the individual responsible.
- Never return chemicals to reagent bottles.
- close chemical bottle immediately after use
- comply with fire regulations concerning storage quantities, types of approved containers and cabinets, proper labeling. If uncertain about regulations, contact the building coordinator.
- use volatile and flammble compounds only in a fume hood.
- never allow a solvent to come in contact with your skin. Always use gloves.
- dispose of waste and broken glassware in proper container
- clean up spills immediately.
RESULT:
1. List the protective procedure in lab. Attach pictures as proof.
 |
|
 |
|
 |
|
 |
|
6) gloves ( glasses may be preferred to contact lenses )  |
|
7) using appropriate pipetting devices and understanding that mouth pipetting is forbidden. |
2. Locate and list of emergency procedure in lab. Attach pictures as proof.
1) eye wash stations
 |
|
2) first aid kits
 |
|
3) fire extinguishers
 |
|
4) chemical safety shower
 |
|
5) telephone / smartphone
 |
|
6) emergency numbers
 |
|
7) emergency location plan
  |
DIAGRAM LEVEL OF HAZARDOUS
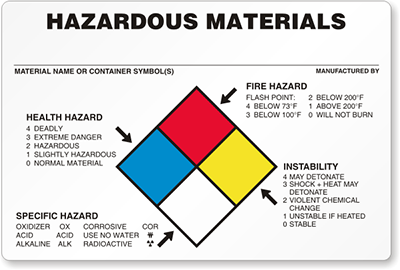
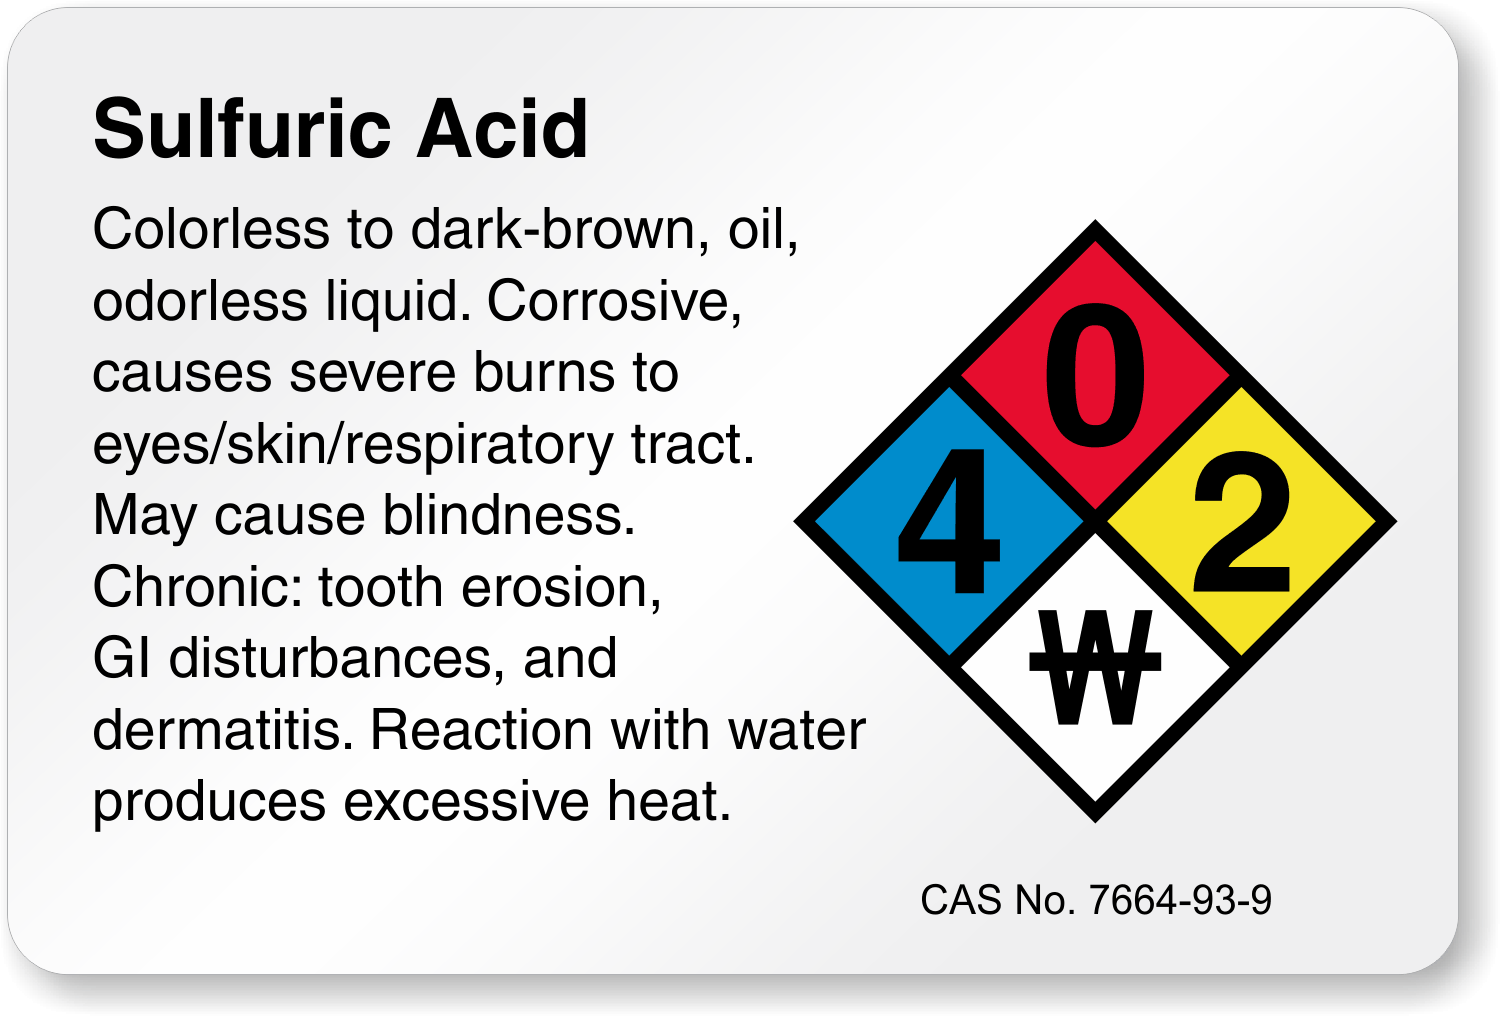
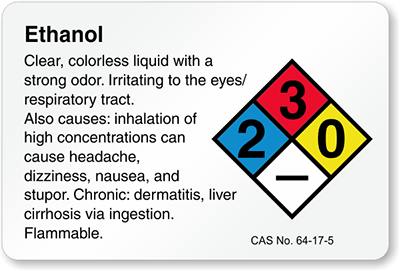
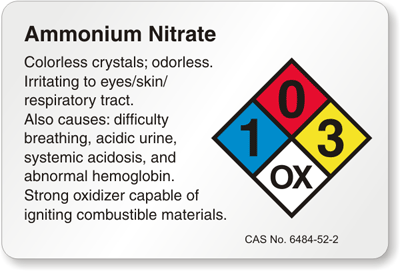
Identify the hazardous level of 5 laboratory chemicals in lab. Attach pictures as proof
Laboratory chemicals
|
Hazardous level ( NFPA Label Pictogram )
|
 |
 |
 |
 |
 |
 |
4 ) sodium hydroxide ( NAOH )
 |
 |
5) ammonium nitrate
 |
 |
DISCUSSION:
From this experiment, the safety aid and equipment in a laboratory is identified. It is utmost
important to prevent serious harm or damage or potential hazard to the environment. Therefore,
everyone in the laboratory must follow the rules stated. Besides, we studied prohibitions in the laboratory and the steps we should take in case of emergency. These prohibitions must be followed to prevent severe and long-lasting injury or damage.Next, we studied the hazardous chemicals that are stored in the laboratory. We identified the chemical hazard symbols, type labels and hazard description of the few chemicals. The label on the bottle should be read first before handling the chemical for safety use.
CONCLUSION:
This experiment introduced us to chemical management and safety. This is the basic laboratory
technique that must be applied before conducting any experiment. In order to do so, proper
equipment are worn and the chemical hazards are recognised and the correct way to handle it is
known to ensure one’s safety. Safety aids and its functions are identified in case of emergency
breakout or injury.
REFERENCES:
1. Safety in Academic Chemistry Laboratories (n.d.). American Chemical Society. ( 2017) .
Retrieved from
https://www.acs.org/content/dam/acsorg/about/governance/committees/chemicalsafety/publications/safety-in-academic-chemistry-laboratories-students.pdf
2. Safety Health & Wellbeing . The University Sydney. ( 2018) . Retrieved from
http://sydney.edu.au/whs/guidelines/others/laboratory_safety.shtml
3. Lab Safety and Guidelines. Lab Manager (2017). Retrieved from
https://www.labmanager.com/lab-health-and-safety/2017/12/science-laboratory-safety-rules-guidelines#.W_wBxLEzbIU
Lab 2 - INSTRUMENTATION
Objectives:
Upon completion of this experiment,
students are able to:
1. Learn the correct and proper
method of handling various instruments in a laboratory.
2. Study specimen or substance
using the correct instrumentation method.
3. Follow
the proper cleansing method of instruments to avoid contamination.
Introduction
Instrumentation is a set of management and methods
in using an instrument. It is utmost important to have proper instrumentation
skills when using an instrument to prevent the instrument from damage as the
cost of an instrument is high and also to prevent the specimen or substance
from contamination or wrong data value due to the wrong usage of instrument.
The instrumentation that will be discussed in this laboratory blogpost is the
calibration of a pH meter, micropipette and microscope. These instruments are
very sensitive such as the pH meter where its glass electrode need to be
cleaned properly with distilled water and wiped with tissue for every usage.
Also, the micropipette tip must not touch any object before loading in the
sample.
A) Calibration of pH meter

Materials:
1. pH meter
2. Distilled water
3. Tissue
4. Buffer (pH 4, 7, 10)
5. Solution x
6. Solution y
7. Solution z
Methods
1. The protective end cover on the
electrode is removed.
2. The electrode is cleaned with distilled
water and excess water is wiped off using a tissue.
3. The Setup button on the pH meter is
pressed a few times until the screen displays the set of pH buffer that wants
to be calibrated.
4. Standardize button is pressed. The
electrode is placed into the first buffer (pH 4) once the signal to place the
electrode appears. Note: Always
start the calibration from lower to higher pH buffer.
5. The first value is displayed once the
meter recognized the buffer. The display will indicate either good electrode “OK” or electrode error “ERROR”.
6. The electrode is taken out and rinsed
with distilled water after “OK” is
displayed. The excess water is wiped off using tissue. The electrode is rinsed
with distilled water between each measurement.
7. Standardize button is pressed. The
electrode is placed into the second buffer (pH 7) once the signal to place the
electrode appears. The same procedure is repeated until all the buffer have
been standardized.
8. The pH for solution with label x, y and
z are measured once the calibration is done.
Results

Solution
|
pH value
|
x
|
5.05
|
y
|
7.03
|
z
|
8.78
|
Discussion
The knowledge
that we acquire from the study of instrumentation on the calibration of pH
meter is the proper and correct way of using the pH meter, being a very
sensitive instrument. This is the reason why it is cleaned thoroughly with
distilled water between every usage to avoid wrong value or “ERROR” being displayed on the screen.
The second thing we learnt are the steps in calibrating a pH meter using
buffers of different pH values. Calibration is important in standardizing pH
values using buffers and to determine the values of pH for solutions.
One error that
is observed during the calibration using buffer is no “OK” nor “ERROR” is
displayed on the screen. This is due to the mistake where a high pH buffer (pH
10) is used before a low pH buffer (pH 4).
It is necessary
for all buffer solution to be at the same temperature during calibration
because buffer values are dependent upon temperature. A slight difference in
temperature can change the pH of the buffer.
B) Micropipette


Materials
1.Micropipette
Methods
1. Set the desired volume by turning the centrally located rings clockwise to increased volume or
counter clockwise to decreased volume.
2. Load a sterile tip. Be sure to use the proper size tip for each pipette. Close the tip box to
maintain sterility. Do not allowed the pipette tip to touch any object.
3. Load the sample. The plunger will stop at two different positions when it depressed. Push the
plunger down slowly to the point of first resistance : this is the load volume.
4. While holding the plunger at the load volume set point, put the tip into the solution so that it is
immersed just enough to covered the end (3-4mm).
5. Slowly released the plunger to draw up the liquid making sure to keep the tip immersed.
6. Delivered the sample. The second stopping point can be found when the plunger is depressed
beyond the initial resistance until it is in contact with the body of the pipette. This second
stopping point is used for the complete discharging of solutions from the plastic tip. You should
not reach the second stop when drawing liquid into the pipette, only when expelling the last drop.
7. Place the tip into receiving vessel. Depressed the plunger all the way to the bottom to expel all
the liquid.
8. Pressed the discharge slider on the back of the grip to discharged the tip.
observed ?
|
|
these pipettes.
2. Always select the smallest size pipet that
will handle the volume you wish to move to
achieve the greatest accuracy.
3. Do not allow the pipet tip to touch any
object.
4. Always use a new tip for each different
liquid.
|
with the volume mark and the pipet vertical.
If you are looking up at the pipet, the
meniscus will be too high when it appears to
align with the mark. If you are looking down
at the pipet, the meniscus will be too low
when it appears to align with the mark.
2. Forcing the solution out of the pipet causes
too much to be delivered.
3. Using a dirty pipet causes too little or
contaminated solution to be delivered.
Leaving little droplets behind on the walls
(except for the small amount in the tip) causes
too little solution to be delivered.
4. Allowing the tip of the pipet to rise above
the liquid in the container usually causes the
liquid to be sucked into the pipet bulb.
5. A broken or chipped pipet can reduce the
amount of liquid held after transfer. This
causes too much liquid to be delivered.
|
Discussion :
1. Why it is encourage to always select the smallest size pipette that will handle the volume you
wish to move ?
Smallest size pipet that will handle the volume you wish to move to achieve the greatest
accuracy. Accuracy decreases as you use unnecessarily large pipets for small volumes.
2. Why the liquids from the pipette need to be release slowly, especially with large volume
pipettes?
This prevents liquid from rushing into the end of the pipette and clogging it up. This is especially
important with large volume pipettes (200-1000ml).
3. Why the pipette cannot be point up?
This may cause liquid to run down into the pipette destroying it.
Reference :
How to use a micropipette by Kellie Henry (April 2011), retrieved from
https://www.mcdb.ucla.edu/Research/Goldberg/HC70AL_Su14/pdf/How%20to%20Use%20a%
20Micropipettor.pdf
Using a micropipette by Diamantina Institute (April 2017), retrieved from
https://di.uq.edu.au/community-and-alumni/sparq-ed/sparq-ed-services/using-micropipette
C) Microscope


Materials
1. Microscope
2. Thread
3. Oil
Methods
1. Microscope
2. Thread
3. Oil
Methods
1. A prepared slide was picked and observed under the microscope using different magnification.
2. The low power which is (4x) was used on the microscope to locate the specimen on the prepared slide. The seen observation was drew.
3. Carefully the microscope was switched to high power after we have centered the specimen that we were viewing in the center of the field of view. The seen observation was drew.
4. The procedure were repeated using higher magnifications up to 100x magnification.
5. The observation under the microscope using 4x, 10x, 40x and 100x magnifications were drew.
What have you learnt?
|
What error (if any) during handling did you
|
observed?
| |
identify and understand the principle components of a light microscope
set up and use a light microscope
understand why different staining procedures are used on tissue sections
|
Touching the lenses of the objectives. (The skin contains fatty acids which may not begood to the lenses.)
Holding the microscope carelessly not in an upright position. (This can cause eyepieces to fall out from the instrument.)
Using paper towels or cloths instead of lens paper in cleaning the lenses of the ocular objectives, condenser, and mirror. (This may tend to scratch the delicate glass surfaces.)
|
1. Draw what you observed under the microscope using 4x, 10x, 40x and 100x magnifications.

4X

10X

40X

100X
Conclusion
In conclusion,
there are three instrumentation skills associated with three different instruments
namely the pH meter, micropipette and microscope that we have learnt. Next, all
the objectives of this laboratory experiment are achieved. We have learnt the
correct and proper method of handling the pH meter, micropipette and microscope
in the laboratory. We have also studied specimen and substance using the
correct instrumentation method. We also followed the proper cleansing method of
instruments to avoid contamination. All of these aspects are very important in
the management and process of a laboratory experiment as it can alter our
result and cause damage if improper instrumentation is used. Therefore,
briefing on the methods in using an instrument by the instructor is always
conducted before experiments are carried out.
References
11. Cole-Parmer. (n.d.). pH meters. Retrieved from http://www.jenway.com/faq_pH_Meters.asp
22. Xylem Inc. (n.d.). pH CALIBRATION AND pH SOLUTIONS.
Retrieved from http://www.globalw.com/support/ph-calibration.html
33. Instrumentation. (2018, October 22).
Retrieved from https://en.wikipedia.org/wiki/Instrumentation


Comments
Post a Comment